How to properly remove floor tiles
Find a floor tilerLast Updated on
What is the best way to remove the tile floor? This guide shows you how to remove tile floor in just five easy steps. Read on to find out.
There are many reasons why you may need to change or remove your tile floor. Maybe the tiles are too slippery and pose a danger to anyone getting out of the shower, or you cracked the tiles while moving furniture. Or you want a different look and style for your home. Whatever the reason, you need to know how to remove tile floor and do it right.
So, what’s the best way to remove the tile floor? Stick to these five easy steps, and you’ll remove the tiles in no time:
You need to prepare the area before you start digging and pulling up the tiles.
Find the best starting point, i.e. the corner of the room and start working from there.
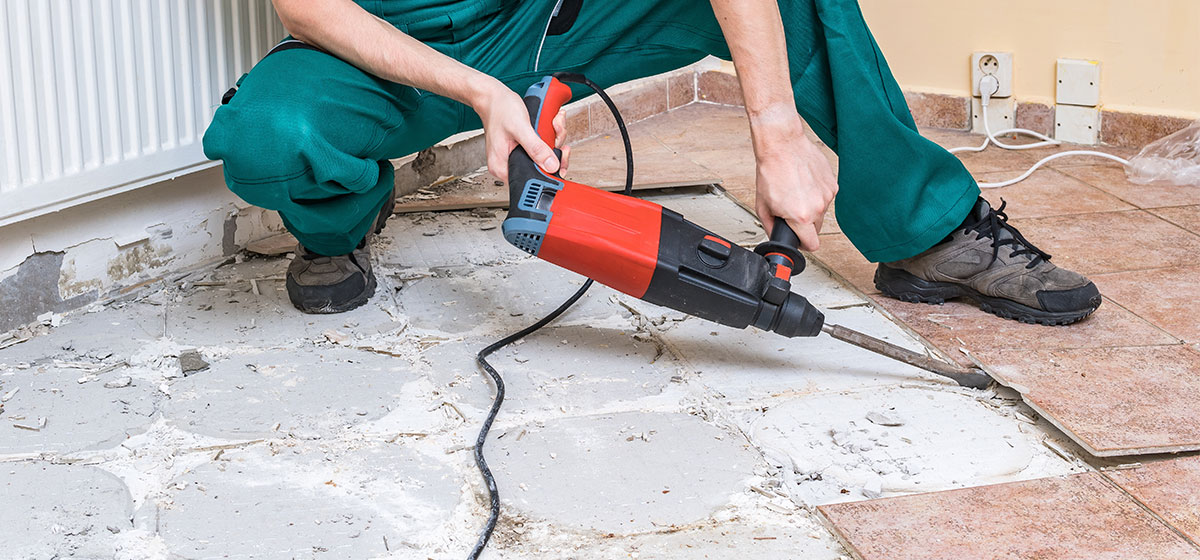
Start removing the tiles but don’t use too much force to minimise breakages.
Inspect the underlayment and subfloor.
Clean up the mess.
Tools for the Job
What tools are needed to remove floor tile? You’ll need a combination of hand and power tools to remove tiles. Here’s a quick list of must-have tools for a floor tile removal task:
A hammer
Screwdriver
Scraper
A long-handled floor scraper
Buckets
Shovel
Pry bar
Plastic wrap and tarps
Vacuum cleaner
Painters’ tape
Once you gather the right tools, you need to have protective clothing to prevent injuries when removing a tile floor. A broken tile is sharp and can easily pierce through the skin if you don’t have protective gear. Wear long-sleeved shirts and trousers, safety goggles and gloves during the entire time. You should also wear a safety mask to avoid breathing in the concrete dust.
Prepare the Area
Before you start removing the tiles, you need to prepare the area. Preparation is an essential step because it keeps your possessions safe and secure and sets the tile removing project up for success.
Remove all the items on the floor: make sure that there no items standing on the floor, after all, you’re removing the tile that the items are standing on. This includes all appliances, stands, tables, basically, anything that is covering the floor. You should also take this opportunity to throw some of the unwanted items out of your home. Transfer the important things to another room.
Take off the baseboards: use a hammer or a screwdriver to take down the baseboards on your walls. Take the baseboards down carefully if you want to reinstall them once you remove the tile flooring.
Seal all the vents: there will be a lot of dust when removing floor tiles. Seal the vents using painters’ tape or plastic wraps to prevent debris and tiles from clogging your air system.
Cover the things that you cannot move: if you’re removing tile floor in your kitchen, items such as built-in shelves and kitchen island cannot be moved. Cover such items with tarps to keep off dust and debris.
Cover the surfaces too: you don’t want the dust from the tiles to cover the cabinets and the bottom of the walls. Cover these surfaces with plastic, and you won’t have to clean up.
Try to get as much space as you can when removing floor tiles, so, anything that is movable should be moved.
Remove the Tile Floor
Inspect the tiles and look for tile pieces that are cracked, detached or chipped at the edges; such tiles are easy to remove.
If there are no cracked, chipped or loose tiles, you need to create a starting point. The best place is the corner of the room, a doorway or where the tile floor ends. Once you find the right starting point, start removing the tiles.
You can loosen the tile at the edges, or you can hit it in the middle until it breaks. If you don’t want the process to get too dirty, place a chisel on the edge of the tile, drive it underneath the tile using a hammer at a slight angle and quickly lift the tile from the ground. Keep hitting the chisel, and the slab will slowly separate from the floor. Do not be too concerned if the tile breaks into small pieces
After removing the first tile, it will be easier to remove the next tiles. Continue to the next one and place the chisel under it, drive the chisel in with a hammer and lift the tile.
If you encounter stubborn tiles, hit the tile with a chisel until it breaks. Drive the chisel in with the hammer, and you’ll remove the tile from a different angle. You can also use a pry bar to remove stubborn tiles.
Pick up the broken tile pieces and place them in a bucket.
Key Points to Remember
Removing the tiles with a chisel and hammer is the best method if you’ve never done it before, but it will take some time.
If you’re experienced in removing tile floor, you might switch to a long-handled floor scraper after removing a considerable number of tiles with a hammer and chisel
Do not use excessive force or you’ll damage the floor or even injure yourself.
Remove the large chunks using a shovel and haul them off in a bucket.
Switch back to a chisel and hammer as you start removing the tiles closer to the cabinets and walls.
Keep going even if the process takes more time than you expected.
Remove the Adhesive
After removing all the tiles from the floor, you’ll be left with smaller broken tile pieces scattered all over. Sweep them up and throw them away. You don’t want to take off your safety gear for this step because the small tile pieces are sharp and can cut your hands. To save time, use a vacuum cleaner to pick up the dust and smaller pieces.
Remove the grout and glue using a hammer and chisel, just like the tiles. You can also use an adhesive remover to remove the floor tile adhesive. Cover the adhesive patches with an adhesive remover and leave it for the recommended period. After the time is up, the glue loosens, and you can easily remove it using a scraper. Use a chisel and hammer if the tiles were laid in tile cement.
Smoothen the floor using a floor scraper. The floor scraper has a wider edge that makes it easy to scrape off the debris. Use forward motions to smoothen all the rough patches.
The floor scraper also leaves dust and pieces of grout, use a vacuum cleaner to remove the small bits and dirt.
Remove the adhesive and remember to open the windows to eliminate the adhesive fumes.
Important Tips
If you used underlayment when laying floor tiles, you have to remove it.
Start by removing all visible screws.
If the underlayment is not in good condition, take it off using a pry bar.
Watch out for the nails and screws when picking up the pieces.
Apply Thin-Set Mortar to Level the Floor
After removing the tiles, the adhesive and the underlayment, you’ll see uneven surfaces and holes on the floor. The thin-set of mortar corrects the imperfections on the floor, leaving it flat and even.
Follow the instructions on the bag when mixing up the mortar to get the right consistency.
Apply the thin-set mortar using a square-notched trowel to get a levelled-up ground if you decide to re-tile the floor.
Clean Up
Depending on the size of the project, you will have lots of buckets filled with adhesive, broken tiles and underlayment tiles that you have to throw out. You can wait for the local authority to pick up the trash or hire dumpster rental services.
Call the Professionals
Removing the old tile floor is a job for the handy. It’s tedious work that will take a lot of your time, so you must be patient and consistent. If you don’t have it in you to remove tile floor or maybe you don’t have the time to do it, then you should hire a tiling expert. Post a task right now, and you’ll receive quotes from tilers near you. A skilled tiler protects your items, removes the tiles, levels the floor and hauls off the debris leaving behind a clean home or office.
FAQs on How to Remove Floor Tiles
Find floor tiler, fast
Find a floor tiler