In a world of screens and toy unboxing videos and whatever else, it’s always good to encourage some old-fashioned outdoor fun with your little ones. As we all know, one of the most enjoyable outdoor elements is mud, and with the mud kitchen, DIY play areas are simple to create!
But what is a mud kitchen? A fair question and the answer may not surprise you. A mud kitchen is a pretend outdoor kitchen where you and the kids can create culinary mud masterpieces.
So how do you create a mud kitchen? DIY lovers rejoice because there are no rules. You can make them intricate or simple, big or small. To help, we’ve gathered some tips to inspire your kids’ mud kitchen DIY task to ensure hours of muddy fun!
How to make a mud kitchen: DIY tips
Tip 1: Start with a stack of old pallets
As we’ve mentioned, there are no rules when it comes to pallet mud kitchen DIYs, so you can make them out of pretty much anything. The easiest materials will be recycled pallets or bits of timber, anything that can replicate benches and stovetops to form the structure of a makeshift toy kitchen.
If you already HAVE a toy kitchen, well…you can save a lot of time by moving it outside *wink*.
Tip 2: You have to have a stovetop
If you think that cooking actual food in your real kitchen would be tricky without a stovetop, we can guarantee it’s even harder to operate a mud kitchen without one. You need an oven and a stove somewhere in your set-up, so we recommend painting the stove elements onto a piece of timber.
You can even use or find an old microwave to really set the scene. Just make sure you remove the power cords first.
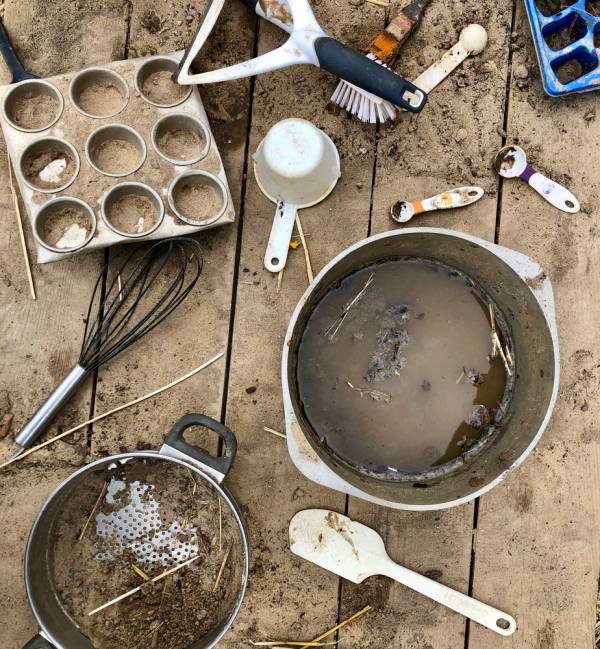
Tip 3: Include the cookware and utensils
Whether you have old crockery around the house or find the nearest yard sale and pick up a stack for a few dollars, you have to include cookware. You wouldn’t want to get dirty while you eat your mud food, after all.
Include old pots, pans, containers, measuring cups, and anything else you don’t need in the real kitchen and use some hooks to hang various implements on display to give your mud kitchen an authentic look. (It also makes it easier to find these utensils while mud-cooking.)
Nothing screams mud kitchens more than some classic old wooden spoons, ladles, and spatulas hanging around the mud kitchen area. Keep it rustic with some knocked nails straight into the fence.
Tip 4: Include shelves for storage
Your mud kitchen set-up could benefit from some shelves to keep track of all the different cooking items. You can bolt some to the back fence as part of your defined mud kitchen area and use your pallets to form benches underneath.
Top these off with some cute jars and accessories to ensure your kitchen is worthy of Instagram, of course.
Tip 5: Ensure the correct kitchen uniform
A few waterproof aprons and gumboots should be part of every mud kitchen uniform primarily because mud kitchens are not bound by the health codes of standard kitchens, which is why they can become quite dirty.
Tip 6: Everything and the kitchen sink
Mud kitchen implements get extra dirty, so include some plastic buckets as a makeshift sink area which can easily be hosed down when playtime is over.
Alternatively, you can knock things up a level with a real kitchen sink from a second-hand building yard!
Tip 7: Define the menu
Mud pies? Sure, everyone knows about the classic mud pie. Your mud kitchen, however, should be more unique. Craft a range of delicious dirt-themed dishes on a menu so the guests of the mud kitchen know what they can order.
Add a chalkboard for the daily specials and laminate some muddy meal plans, so they survive the mess.
Tip 8: Set the table
Add a table and chairs as an extension of the mud kitchen to form an outdoor mud cafe. Opt for a plastic tablecloth to save the washing, or match the outdoor decor by using a tree trunk table and chairs.
If you set it up nicely, the kids may even want to have real meals outdoors as well!
Tip 9: Diversify your food options
While spoonfuls of soil are a staple in the mud kitchen, don’t be afraid to diversify a little. Fruit made of rock, leaves, flowers, gumnuts, and other “ingredients” in jars and baskets allow you to offer a wide palette of plant-based treats to compliment the main dish.
Tip 10: Mud, the main dish is mud
The mud pie is, after all, the reason why customers visit your kitchen. Be creative with mini mud cakes in cupcake wrappers or old reusable muffin moulds to make sure that your mud cake creations look better than they will likely taste. Who knew that DIY mud recipes could be so fun?
Building your mud kitchen DIY frame
Once you have found your pallets, the following steps will help you to craft the frame of your mud kitchen.
The tools and materials you’ll need
- Wood saw
- Drill and drill bits
- Sander – electric
- Pencil
- Pallets x 2
- Marine ply – 1200mm x 600mm
- Timber screws – 50mm or 20mm
- L-brackets
- Wingnut – 6mm / Bolt – 6mm
- Cup hooks – 32mm
- Protection
Step-by-step instructions
- Start by cutting one pallet in half. These will be the sides of your kitchen. Give the edges a light sand with an electric sander to avoid splinters. You can paint the sides of the kitchen at this point to get creative with your look.
- Attach your sides to the timber length you’ve picked for the top by flipping it upside with the pallets placed on either side with the slatted sides acing out. Drill pilot holes that are slightly smaller than your screw to prevent the wood from splitting, then drill your screws. The base of your kitchen is now complete!
- Use L brackets, flip your kitchen onto its side, then position your brackets under the bench to allow for a back to be added to your kitchen.
- Grab a steel mixing bowl and attach it to the bench with a nut and bolt as a makeshift sink. Drill a hole through the base of the bowl and attach using a bolt and wing nut.
- Attach some hooks to hang utensils

Frequently asked questions
How do you make a homemade mud kitchen?
A homemade mud kitchen can be made in a variety of ways depending on which materials you have available, how big, and how permanent you would like it to be.
A simple way to create a mud kitchen is with these steps:
- Assemble the frame that will be used for the cooktop using 2x4s or old pallets
- Add legs to stabilise
- Create a lower shelf frame if required
- Add a durable top, shelf top, and backsplash using fence boards or plywood
- Sand the frame to ensure there will be no splinters
- Add a makeshift sink and hooks to hang utensils
What mud do you use for a mud kitchen?
The type of mud you use will depend on the favoured palette of your customers – kidding. An easy way to gather the mud you need as the key ingredient in your mud kitchen is the soil from purchased loam topsoil as opposed to pulling it from your garden. Pop down to your local garden centre for a cheap bag and make sure you avoid compost. Firstly, it’s a little gross, and it does not behave like soil for fun mud play. After all, you want to be a five-star rated mud kitchen, right?
How do you make a mud kitchen with an old sink?
Using an old kitchen sink in your mud kitchen is great as it will make everything look far more realistic. You should be able to find a very cheap, old kitchen sink at a local scrap metal outlet or online via a community board or second-hand website.
Once you have the sink, cut the posts and frame to fit, providing a surface area for your sink, then add backboards and hooks to hang utensils. You can design and add whatever you like to give your mud kitchen a realistic feel that matches the sink.
Have fun making and using your pallet mud kitchen today!
Remember, the building of your mud kitchen should be fun! This is a cost-efficient way to get your kids (and yourself) outside with a new play area that can easily be taken down when the novelty wears off.
If you love the idea of a mud kitchen but simply do not have the time to put one together, you can search a range of skilled Taskers to assemble your outdoor furniture for you. They can build a mud kitchen or any other kind of furniture you may like!
If you are considering adding some more ‘grown-up’ furniture to your backyard, check out our blog on which outdoor furniture may be best for you. Hopefully, you can find some design inspiration there and turn your backyard into a more inviting and comfortable space!
Save money and DIY: How to reupholster your sofa
DIY: How to build a shed you’ll love!
The best tips for privacy: How to screen in a porch
How to build a DIY dining table that will impress your guests

Be as loud as you like: How to soundproof your home effectively